Saturday, 1 December 2007

Experimenting with Substances - Building Character!

OK, no need to panic dear reader, I have not suddenly gone 'off the rails' - to be in my mental state requires years of sustained abuse anyway. But away with such trivia for the moment...

No, this small (and probably welcome) departure from matters pertaining to Badman Pipe Factors will hopefully show how I have gone about sculpting my own figure. In truth, the end result may well find gainful employment somewhere in the yard, but for now let us not dwell too much on that.

Now model figures are of course not confined to the domain of railways - they are pretty much the stock-in-trade for your average wargamer, for example. It follows, therefore, that the practice of sculpting figures is quite widespread, and indeed some fine web-sites are to be found without too much effort.

The techniques, as one might imagine, are many and varied, as are the available sculpting materials. Being a newcomer to this sort of thing, I had doubts about my ability to produce a figure from scratch. So, I decided to cheat. Well, probably overstretching the term really, but in short my idea was to take an existing figure and alter its pose in some way, whilst at the same time adding some modest detail.

But with what? Well there are lots of materials available, under a variety of brand names: Sculpey, Fimo, Milliput (which is a two-part sculpting/carving/filling material), and a substance called 'Kneadatite Duro', but which almost universally known (amongst we sculptors!) by the name of 'Green Stuff'. Green Stuff starts out life as a strip of yellow and blue 'putty', which remains soft until such time as it is mixed to a consistent green. Once mixed, you have about 2-3 hours in which to mould, sculpt or otherwise shape it before it cures. Even when cured it is slightly flexible, but is firm to the touch and takes paint readily. When exposed to a nominal heat source - such as a table lamp - the curing is accelerated.

OK I admit it - I'm rubbish at explaining stuff in words, so here is a sequence of photos which should clarify things somewhat:

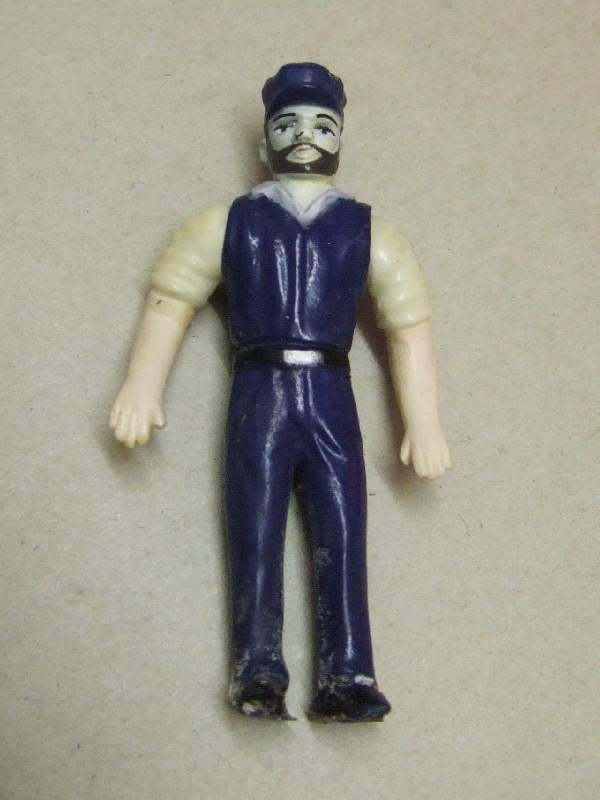
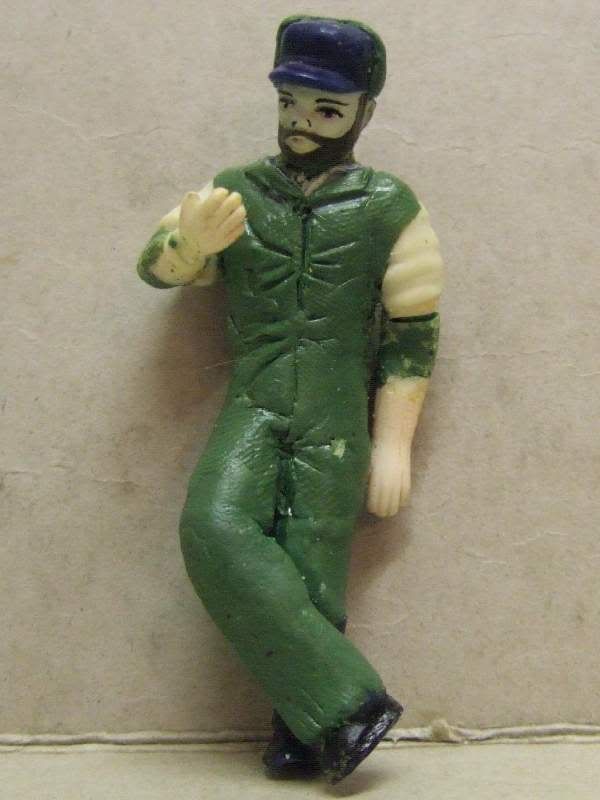
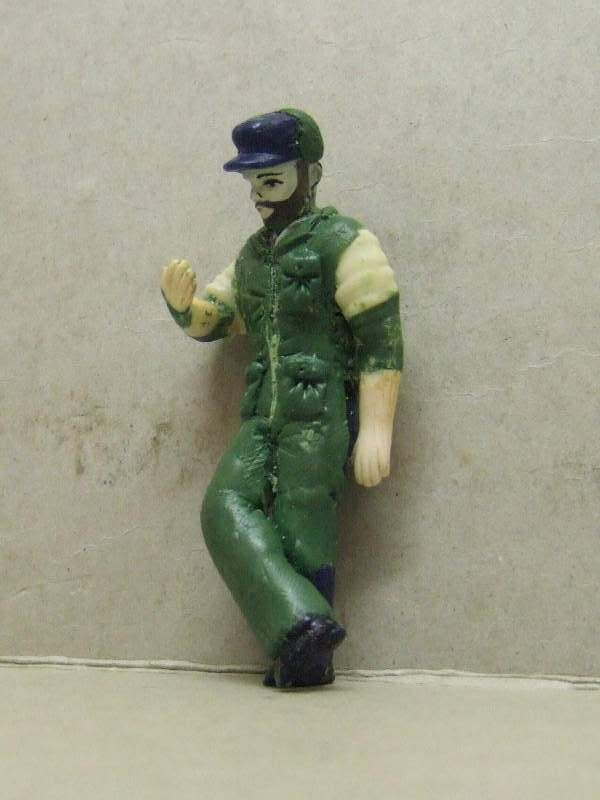
First, please welcome our victim - err, I mean - hero. His name is Dave. The intention is to transform Dave from a somewhat toy-like blob of plastic to a fine upstanding individual, who, once I am done will in all probability be seen leaning casually against a wall reading a book.


Now in rearranging the figure's pose, I must, however reluctantly, take the rather drastic step of dismembering the body - that is, separating the head, arms, legs, hips and torso..... Dave, where are you going, this won't hurt I promise.... Furthermore, I need to cut the arms at the elbow and the legs at the knees. Given that I also want to effectively 'cross' one leg over the other, I need to split the hips down the middle from front to back. I bet you winced involuntarily then, didn't you? Here's the same picture with the intended cut lines:


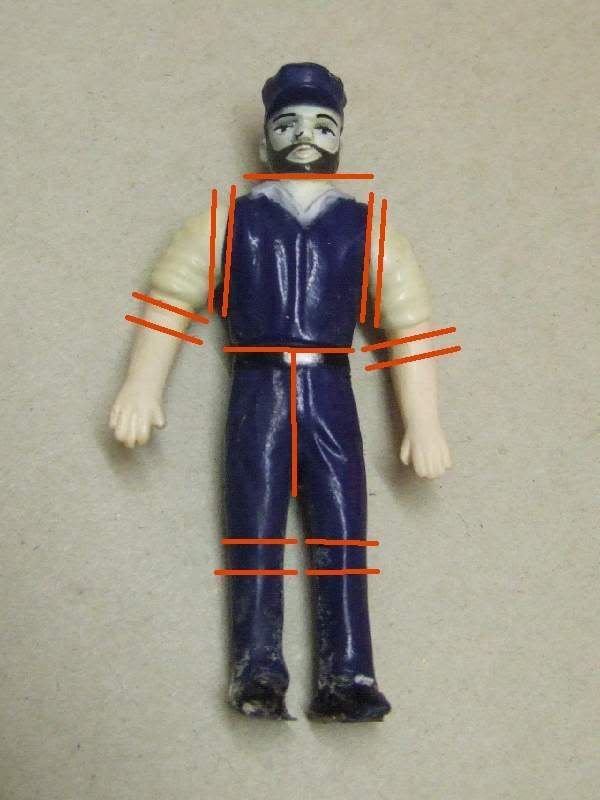
Notice that I am effectively removing the elbow and knee sections completely. If I don't do this, then when I try and introduce a bend in the limb, the overall length of it will look wrong. I am also taking this opportunity to lose the 'body-builder' look by removing the excessively broad shoulders.
OK, down to cases... Nurse, the screens please... scalpel.... forceps.... lager.... Oh dear! It was at this point that I encountered my first hurdle - in dismembering the body, I discovered that Dave is a rather hollow individual! This was hastily resolved by filling his abdominal cavities with an air-drying clay. I could have used Green stuff, but at £5 for a miniscule amount I thought that would be something of an extravegance.


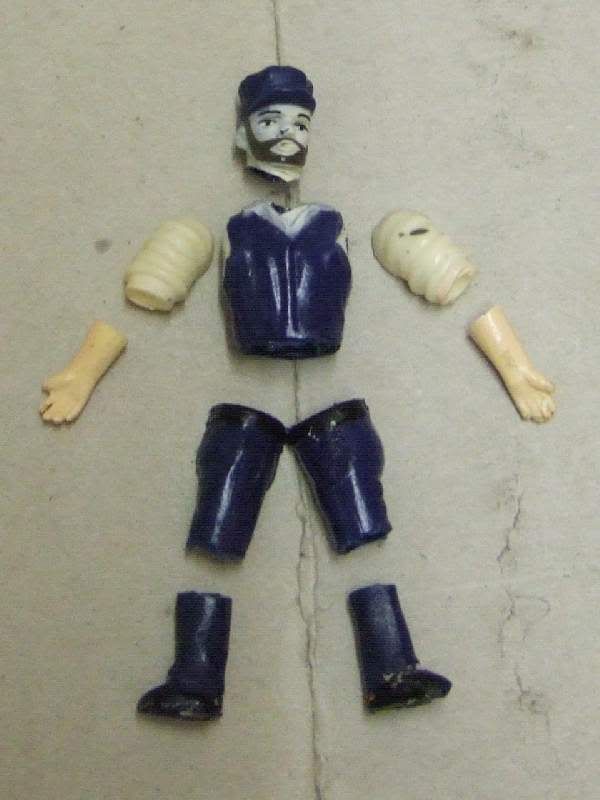
You may very well question the need to fill the cavity anyway - in fact the only reason I had for doing it was to have something into which I could insert some soft iron wire. This wire is intended to act as a skeleton on which to put the Green Stuff, and to hold the original parts together in the desired pose whilst the Green Stuff cured.
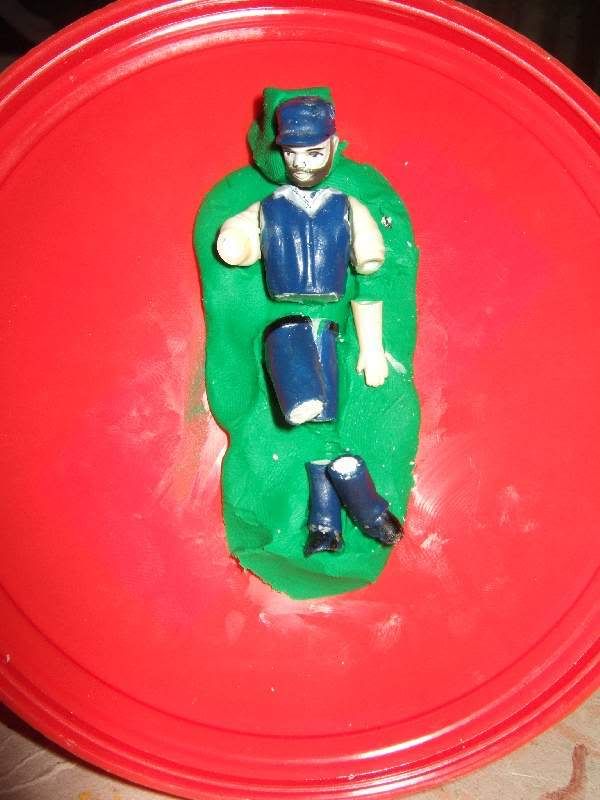
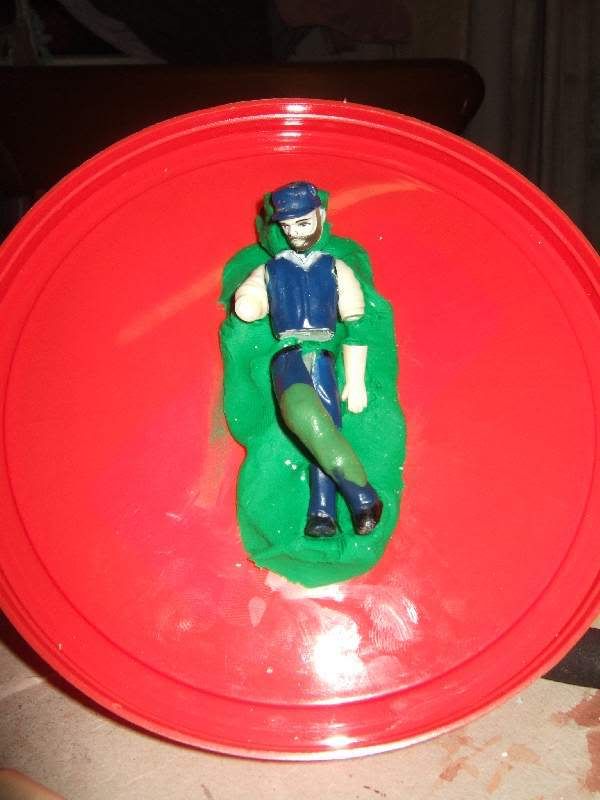
With the body cut up and the cavities filled with clay, I then set about trying to arrange the parts back in the desired pose. Enter another modelling material beloved of children (and modellers) all down the ages - Plasticene. I set up a 'bed' of Plasticene and used that to support the assorted body parts in their intended positions:


So, to the Green Stuff! Here it is, in its 'raw' state:


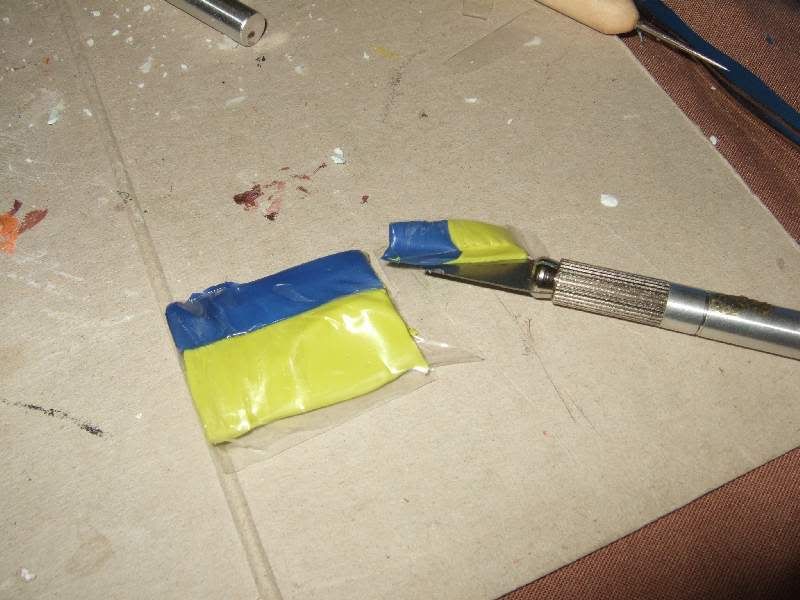
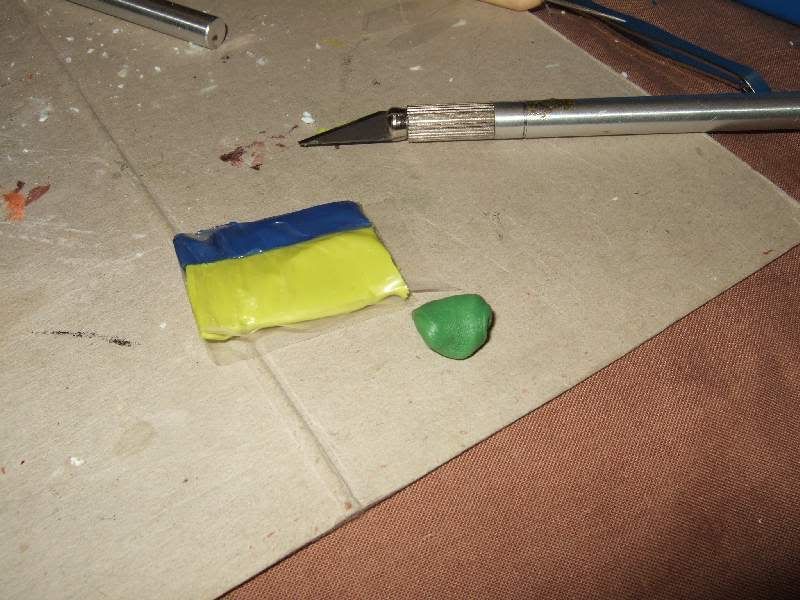
When kneaded and folded and rolled together for a couple of minutes, here's how it looks:


So I then set to joining the various parts back together, using the Green Stuff - starting with the legs, as shown below:


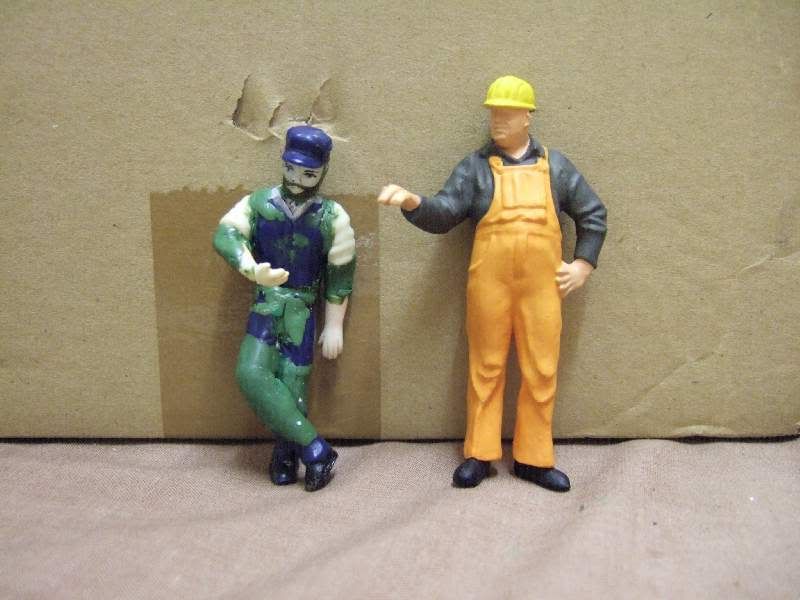
In doing this, it occurred to me that Green Stuff can be quite tacky, and can have a tendancy to stick to fingers when it has no business doing so. With that in mind, I decided that once the basic body shape had been rebuilt, I would allow the figure to cure before proceding any further. Here's the end result, with a Preiser figure for company (and by way of a comparison); a slight difference in height I guess, but then that's people for you!


After 24 hours of curing, the Green Stuff had solidified, yet was still easily carved, scraped and filed to shape. Additionally I was able to start adding some details - in this pic you may be able to make out some lapels on his overalls, as well as some 'flaps' on his hat, to keep his ears warm on cold days!


Another 24 hours later, I was able to add some pockets to the overalls:


Finally, 24 hours later I decided to quit while I was ahead, and spray-primed our much-improved (in my humble opinion, anyway) character with grey undercoat:


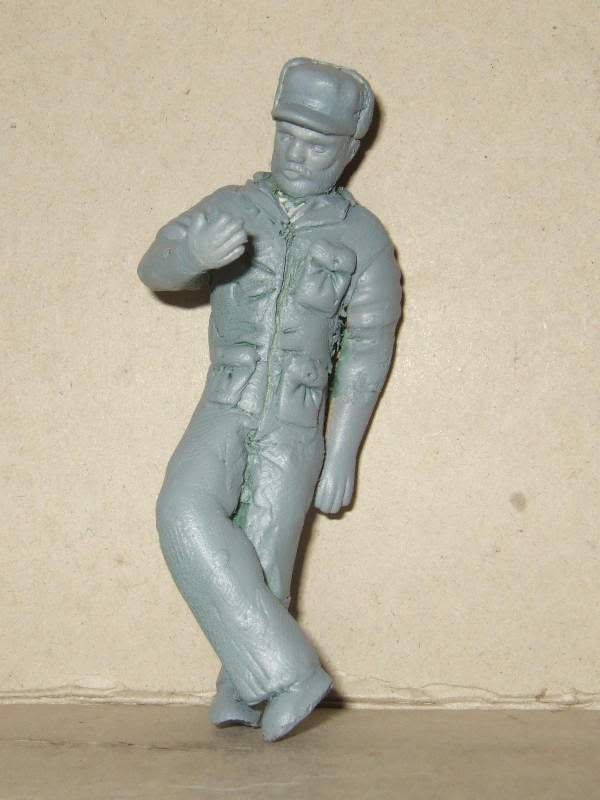
All ready for painting!

This is my first foray into sculpting, and whilst I freely admit it's not a perfect result I must confess I am actually very pleased with it. It's certainly an improvement on how it started. The next time you see our Dave, he'll be all suited and booted, earning his corn at a well-known pipe factory!

Wednesday, 7 November 2007

E. W. Badman Pipe Factors - Part 9: Shedding Some Light

One of the more madcap ideas I had for this small project was to illuminate it in some way (so as to add some extra visual appeal to a potential evening run of the main line); a task which, it would be fair to say, one might readily file away under 'A bit hard for a numpty to attempt given his exploits with wiring the very simple track layout'. No offence meant, I'm sure.

But, dear reader, by now you will appreciate a recurring theme from trawling through earlier episodes in this epic tale: that I am hopelessly dependant on strange coincidental happenings, and not a little leaping of the imagination to aid me in overcoming obstacles to my quest. So it was to prove yet again, when my dear wife, the MD, announced that with the advent of our new garden shed, we would have the benefit of 'natural light' for its internal lighting - by dint of a battery-powered electric light panel. The unit was totally self-sufficient, being kept charged by a modest solar panel. The idea was that the solar panel would be afixed in some way to the shed roof, while the cable passed through the wall to the lighting unit on the inside. All very good - in theory.

The practice was a little disappointing to say the least. The lighting unit, consisting as it did of 5 5mm diameter white Light Emitting Diodes, was shown to be utterly inadequate for lighting anything more cavernous than a cardboard box. So, another criminal waste of 10 English Pounds was consigned to the 'probably come in useful for something one day' store...

But then, guess what? come in useful it did! At a loose end one evening, I dismantled the lighting unit to see how it all fitted together. It proved surprisingly easy to completely detatch the LED board from the rest of the innards - in fact, I managed it entirely by accident. Applying a single 'superbright' white LED from my electrical spares box to the two wires and flicking the switch, I was instantly rewarded with a very bright light. At that moment, I knew how I was going to provide the lighting for the dock-side. For a bonus, I even managed to successfully remove 4 of the 5 LEDs from the now defunct board (the other died on the operating table from an excess of heat courtesy of my 60-watt soldering iron)

The intention is now to mount the box on the garden wall, somewhere unobtrusive, then extend the two wires via a narrow cable the whole length of the factory building. At various strategic points along its length, I shall tap in to the wiring and connect an LED. At this time I hope to use the small white ones for internal factory lighting (shining from the factory windows), with some orange ones 'outside' to give the impression of 'street' lights on the dock-side itself. That's the plan anyway; we shall see how it goes.

For the moment though, here's a couple of shots of the engine-shed:. This first one is a bit blurred, due to some slight movement of the camera as the picture was taken:


This one was taken quite late at night, with a new camera (Olympus E-510 in case you're even remotely interested). I haven't yet got to grips with the various advanced functions, like over-ruling its election to use the flash. The 'pinkish' tinge to the foreground is because of my abortive attempts to mask the washout effect of the flash by covering it with my hand! It does seem to lend a kind of wierd spooky atmosphere to the scene though...


So all in all, the shed light works - provided you have the correct size of shed!

Tuesday, 9 October 2007

E. W. Badman Pipe Factors - Part 8: The Start of Coming Together

Well dear reader, firstly I must apologise for the rather lengthy interval between this and my previous regurgitation of meaningless drivel. Somehow I sense your own disappointment - maybe it stems from the notion that the interval wasn't long enough for you. Oh well, "Ne'er mind, eh?" as we Southern Englanders would (probably) say.

Truth is, I've been on my holidays for a couple of weeks. To Florida. Again. Actually, it turned out to be a reasonably pleasant break; certainly the week in Fort Lauderdale was a notable success. I recommend it to anyone who has yet to see it but was idly thinking about doing so. Despite being on the Eastern - Atlantic - coast of Florida, the sea was very reminiscent of the tepid bathwater of my childhood - although to the best of my recollection none of my baths was ever interrupted by shoals of small panic-stricken silver fish propelling themselves from their watery world into the air above, pursued with equal vigour by a 4-foot-long barracuda. So anyway, I am back, eager to continue this epic saga - probably more so than you are to read it.

Now it came to pass, in the days leading up to my departure for warmer, albeit barracuda-infested climes, I took the opportunity to wire the track with a feed from the adjacent 'main line'. On the face of it the wiring is simple. In practice, however, I spent most of a day wiring it. In fact, I spent a lot of time wondering why it wasn't working - and then unsoldering all my carefully soldered wires and re-applying correctly. I eventually worked out (by actually reading the instructions that came with each point) that because I was using electrofrogs, I needed to apply power to the toe of the point, and have insulating breaks where there are facing points. Duh. No pictures of this - it's too embarrassing.

Thereafter I commenced to 'inset' the tracks by applying a layer of very sloppy mortar up to rail height on the outside of the tracks, and to sleeper top height in between the rails.

Then I let it dry overnight...

Let's say it together: "Uh-oh!"

Disaster!

I broke a point blade: it would be the one I had almost completely immersed in cement - I was trying to free it after it seemed to be gunged-up with stray filler...


After more than a few carefully chosen words - requiring a Direct Debit mandate from my bank account to the 'Swear-box' - I worked out what had happened. Some exploratory surgery around the tie-bar revealed the problem. Whilst the cement was wet the previous day, I wiggled the point blades back and forth in an attempt to clear the path for the tie-bar, but as the cement dried it must have 'caved in' a little, just enough to obstruct it. When I pushed it again the following day, it didn't move, and rather than take any sort of care I tried to force it... "ping"... not a good plan.

Seeing as I haven't compromised electrical continuity, I think I might get away with just glueing it back together. These points won't be operating with any regularity anyway - I certainly won't be powering them up. In any event, I am definitely averse to digging it out and replacing it.

By the way, did you spot the G-Scale 'storm-drain' protruding from the dock side in the picture above? It's a bit of 7mm diameter brass tube with some holes drilled in the body, hopefully to allow egress of rainwater from the tracks... Thus far it seems to have worked.

Well the holiday was looming ever larger, but since the MD had everything covered viz packing, labelling, passports, tickets, suncream, book etc I felt no need to intervene and mess up all her carefully laid plans... so I started building a factory.

You will doubtless recall, dear reader, from Part 2 of this epic, that I had obtained some wall sections from a PIKO brewery building kit, with a view to building the low-relief factory walls. In commencing to use them, I wanted to just do enough to allow me to fit the loco shed (from Part 7, remember?) into the corner where it belongs. The wall panels were stuck on with 'No Nails' glue - supposedly so strong I'll have to knock down the real wall to get rid of the model one! Time will tell I guess.


Finally, a picture of the corner walls in place, with the loco shed cut to fit, and the Hornet with driver Arnold, presumably expressing his disappointment at all the oil leaks on the tracks. Yessir, it's all starting to come together!

Monday, 27 August 2007

E. W. Badman Pipe Factors - Part 7: The Engine Shed - A 'Can-do' Approach

Well, fresh from our foray into weathering, airbrushing and all that nonsense, we return with a will to the next exciting (no, really!) installment of the Badman Pipe Factors private siding. At this stage, I have a dock-side, with some rails, and some wall sections to make a start on the factory building. I have a pipe wagon, and a little loco to push and pull it about. I even have a massive ants nest underneath it all, somewhere, and last weekend was 'FAF' - Flying Ant Fest. Of necessity, building work was halted whilst these beasts were dashing here, there and everywhere - trying to run, fly, mate, and in more than a few cases all three simultaneously. Several casualties must have ensued from that, I am certain, not to say a few 'bar-room tales'. Incidentally, I find it interesting that the 'black ant' and the 'meadow ant' (or 'yellow ant' as they are sometimes known in these parts) are not the best of friends, and yet the winged of both species are black - so why do not the meadow ants attack their own airborne forces? How do they know the difference, I wonder? Be honest, you don't really care, do you? It may however appeal to the darker recesses of your psyche to know that the preparatory training for flying ants is plainly devoid of anything even outlining the dangers of walking along railway tracks, even at a scale of 1:22.5 of the real thing. The body count last evening was testimony enough for me. Work may have stopped: the trains did not...


See how easy it is for me to get side-tracked? What I wanted to share with you was my latest development: an engine shed for the Badman loco, which you will doubtless recall was described in parts 4 and 5 of this saga. I say, 'shed': perhaps more accurately described as an 'engine lean-to', relying as it does on the permanence of the factory walls for 2 of its 4 sides. I am not averse to buying building kits where my own ineptness would see me fail miserably to build my own from scratch - however in this case, I sort of fancied my chances. Especially as I intended to build the entire thing from 'recyclables'. A tin can (hence the title above, do you want to hazard a guess as to how long it took me to think that one up?), some coffee stirrers and some 'rocket sticks' - generously if unwittingly donated by the local residents as fall-out (literally!) from the many long and rather tedious firework parties that seem to stretch the entire month of November these days. Here's the basic structure:


Here's a 'mockup' shot outside, with the basic shed doors leaning against it - more for mutual support than anything else:


Finally, after some wood preserver and a little distressing with a sharp pin, the doors look like they are on their last legs. By the way, observant persons might perhaps notice the doors sporting the ultimate in sadness - working G-scale door hinges anyone?


Total cost of materials: £0.00.


I'll probably try and weather the doors a little further, but as for the shed itself I hope the several thousand gallons of rainwater we're due for in the coming months will do that for me; if the ants don't cart the whole thing off first.

Tuesday, 21 August 2007

Experiments with an Air Brush

A small departure from the trials and tribulations of the Badman Pipe Factors 15-inch gauge line, if I may. About time too, say some of the voices in my head - although, interestingly, by no means all of them. No, this particular blog entry is by way of a confession: Please forgive me, for I have very recently "crossed a line" in G-Scale modelling terms - I have dared to attempt to weather an item of LGB motive power. To the uninitiated, such an undertaking is the equivalent of wearing ski boots in bed - not actually illegal, but why would anyone in their right mind...? You get the idea.

So, whilst the collective brows of my fellow LGB owners furrow themselves to a standstill I will offer my own hopelessly ill-informed view on why this is so? Well you see, dear reader, I believe it's all down to... the 'M' word... money. Even before the shortages caused by the Lehmann company's evident insolvency, their products, certainly in the UK, were a tad... dare I say it... expensive? Well-made though they are, and for all the proud boasts that you could drop a loco from 4 feet and it would merely bounce a couple of times before continuing on its uninterrupted way, you still wouldn't fancy conducting any serious trials! The one saving grace has always been that even second-hand items hold their price - provided they are in 'good condition' or better - and therein lies the problem. Most LGB owners are reluctant to attempt to weather, or paint, or otherwise modify their stuff for fear of adversely affecting the resale value!

Now this is what pees me off about news reports of stock market 'dips' - crashes, adjustments or whatever... "£x-hundred-million was wiped off the value of shares today as the Footsie Top 100 lost 200 points....". They neglect to point out that it's only a loss to those who actually sold, and even then in most cases it's only a loss compared to what they would have got had they sold the shares the day before! If you held on to it, the value of it to someone else is totally irrelevant! OK, perhaps something of an oversimplification of what I'm sure is a very complicated subject. But you see what I mean. In essence: value, like beauty, is very much in the eye of the beholder.

I admit I have until very recently been on the cautious side, being fearful of diminishing this 'notional' value. But no longer! I have decided that I have absolutely no intention of ever trying to recoup anything I have already spent on this hobby of mine, and instead I am going to have a go at making my rolling stock look a bit more like it's been asked to earn a living, thereby enhancing my own personal enjoyment of it. If others wish to keep theirs in the original box, keeping meticulous care of it, then that is fine by me. I only hope that if and when they eventually do sell it (for whatever reason), the price they get reflects the care lavished on it during their tenure.

Having said that, I'm not about to go splashing paint about with reckless abandon. I would like to think that although I am still not an expert in this subject by even the most generous stretch of the imagination, I have learned quite a bit about weathering techniques by practicing on other, less expensive items of stock - my goods wagons. It is largely the experiences gained in this way, as well as the encouragement of some like-minded individuals, that have brought me to this stage.

So, enough blether: what have I actually done? Well, firstly some introductions; presenting our plucky volunteer, a Wismar Hannover-type railbus, almost universally known as a 'Pignose' because... oh, you figure it out:


(ignore the 2 ne'er-do-wells posing in front, they are apparently 'actors' - so they claim)

Now in weathing this particular item, I had in my mind's eye a certain 'dusty' look - no bad rust in evidence, but plainly in need of a wash-down. What I also wanted to to try and obtain a graduated density of dust - densest at the rail level, tailing off to very little at the window level. This called for an air-brush approach. I used diluted acrylic paint, courtesy of Games Workshop - "Snakebite Leather" - that's their name for the colour, by the way. Additionally, a wash of black acrylic around the engine cowling to signify diesel/oil residue, and a little white enamel applied to the grab handles and ladder. Then another going-over with with the Snakebite Leather via the air brush. Here's the end result:


I find air brushing very theraputic, for some strange reason. The trick is not to try and apply too many layers at once, otherwise the thin paint tends to form droplets, like rain on a window. I have found an entry-level compressor to be beneficial as it provides a consistent source of air for the brush. It is possible to spend large bundles of cash on such items; I however spent approximately £70 on a basic 'diaphragm' type - which I am told can cause 'pulsing' of the paint spray, but to be honest for weathering purposes I have not seen any detrimental effects at all.

Friday, 20 July 2007

E. W. Badman Pipe Factors - Part 6: What's Up Dock?

In my meetings with persons from other countries, I am often told that the thing they find most puzzling/amusing/annoying about the British (not me personally, they hasten to add) is that I am (or rather, we are) seemingly wholly obsessed by the weather. Well, I think it's probably fair to say that if they had to put up with what we in these isles have had to endure over the last few weeks, they would doubless be developing a similar complex by now.

Whilst it may or may not be true that the Eskimo have 28 different words to describe snow, it is certainly the case that the British have several more phrases to describe rain - the vast majority of them take the form "___ rain!" where ___ is some choice adjective, normally Anglo-Saxon in origin. And rightly so in my humble opinion. However, it is all too easy to forget (in mid-July 2007 as I write this) that as recently as early June we were all longing for rain, having experienced one of the driest May months on record. How we all vowed then not to complain when it decided to rain again; how we wish now we had kept our collective British trap shut.

Since the beginning of this noble venture I had been attempting to find a window in my crowded schedule in order to create the Badman Pipe Factors dock side, on which would be built the (by now, I am sure) legendary 15-inch gauge railway:


Rain

Rain

Rain

:

:

Rain

Dry, Sunny (attended nephew's wedding, so no chance there)

Rain

Frogs

Locusts

Rain

Hot Hail ('Flash' Gordon, anyone?)

Rain...

...And then, last Saturday, without any warning the clouds parted, revealing a strange and wonderful sight - the sky was a wierd blue colour! And a big yellow ball hung in the sky. It felt warm!


So, straight to work: first things first, get the kettle on - any British artisan will tell you that a job like this cannot be rushed, so best to partake of a 'wet' to steady the nerves.

I used the bricks and blocks that were there for prototyping purposes to form the basic dock side wall, and cemented them in with a mortar infill to create the 'floor'. The mortar in this case was a 2:1 cement:sand mix, with enough water to set the mixture off, but not make it sloppy. Getting a level surface proved to be a challenge, which I approached by mixing up a more 'fluid' mortar with 1:1 proportions of the aforementioned materiel and applying that over the top. Certainly it was easier smoothing out, and the resultant surface was less undulating, but it still ended up with a slight gradient. But here's how it looked:


When I come to bury the track, I will have another attempt at levelling the surface - if anything I need to at least ensure that the gradient if any is away from the garden boundary wall, so the ever-present rain has a chance to drain away to mother earth.

Finally, I took the opportunity to record a short video of the first out-door run of the Hornet, over loose-laid track in more-or-less its intended position. Spielburg I am not:


I'll bet Spielburg couldn't find 28+ phrases to describe rain though.

Wednesday, 18 July 2007

E. W. Badman Pipe Factors - Part 5: Making Heavy Weather

I don't know why, but clean locos of any kind offend my eye. Don't get me wrong, I fully appreciate the effort that loco crews must have put into maintaining their charges, and the traditions upheld in the heyday of steam - working the career path from cleaner to driver via fireman and various points in between - must have been hellish hard work. Yet they must have been instrumental in instilling a sense of pride in the loco; in keeping up its appearance particularly when in the public eye. Perhaps a spell in that sort of role, on some preserved line, would cure me? We shall probably never know. But to me, it's simply a case of: a grubby loco at least looks as though it's done some work!

Anyway, as a part-time philosopher once said: "We are where we are, guv - that'll be 8 quid." I decided that in the case of the Badman Pipe Factors private 15-inch gauge railway, function would indeed come before fashion. The rolling stock, exposed to several years of toil, harsh living and not a little neglect, would thereby come to look decidedly shabby, with much rust, dirt, oil and dust in evidence. In particular the company's 'Hornet' loco would bear the brunt of my fixation. But how to go about it? In a word: weathering.

Sadly I do have to at least start with a 'pristine' loco - that is, paint it like it was just outshopped (Oh, and say 'hello' to Arnold the driver, by the way):


Now be honest, did you actually say 'Hello' then? You did? You need to get out more... incidentally, if you want to see the technique I used to paint him, click here.
OK so now the fun can start. I try to imagine where the dirt, grime, dust, rust etc would accumulate, then build the effect up over a series of 'layers' until I'm happy with the result. I often think the trick with this stuff is knowing when to stop! Here are some of the techniques I use:
  • Washing - using a dilute paint solution to allow the chosen colour to 'flow' into low-spots on the model, collect in corners etc.
  • Dry-brushing - using absolutely the minimum amount of paint on the brush, then flicking the brush over high-spots on the model to make them 'stand out'.
  • Dry-sponging - as with dry-brushing, except using a piece of foam rubber or similar
  • Texturing - using a fine powder e.g. talcum powder to add texture to paint - particularly effective when applying 'rust' to a model.
  • Air-brushing - using an air-brush (or aerosol spray) to apply a fine layer of colour - useful for making things look 'dusty'.
After an initial dark wash, and some sneaky 'wasp-striping' on the buffer beam, we have this:


To me, nothing spells 'neglect' like a good rust-patch - or patches. To that end, I use a combination of a dark brown colour, with some talcum-powder to give a 'rough' texture - followed by a dry-brushing/dry-sponging (depending on the area to be covered) of a bright orange over the top. Err, like this:


By the way, in case anyone is tempted to think that I am setting myself up as some kind of expert on this subject - forget it. I am still very much a learner in this field. I have no doubt that there are many countless people round the world who are far better at weathering models. All I can say is that I am improving with time and practice, and that the ideas expressed here worked for me. I only hope that my publishing my ideas here encourages someone else - perhaps you, dear reader, if you have not already done so - to have a go.